Latest Entries »

INGREDIENTS:

  • 2-2 1/2 cups of “cooked” chicken.  I used left over rotisserie and chopped into bite size pieces.
  • 6-8 slices of cooked bacon…I lean towards LOTS of BACON
  • Assorted veggies that were in the fridge that I needed to use up..Brussel Sprouts, sliced, assorted colorful peppers, chopped, broccoli, chopped..you can use spinach, kale, onions you name it…and I sautéed them all together in a pan with bacon grease because you need to cook the veggies
  • 1 tbs of mince garlic that I added to the sautéed veggies along with some of my favorite seasonings…your choice!
  • 1 1/2 cups of shredded cheddar cheese…or you can use whatever you have on hand! I saved 1/2 of cheese to put on top
  • 1 cup of Guacamole Salsa that was staring me in the face but the recipe from “Wholesome Yum” suggested a ranch dressing…to time consuming to make and I cut it with 1/4 c of sour cream to make is less spicy (tho if it were just for me, I would not have cut it) and saved about 1/4 c to put on top along with the cheese.

IMG_3842fullsizeoutput_7e47fullsizeoutput_7e42fullsizeoutput_7e48


DIRECTIONS:

  1. PREHEAT OVER TO 375 degrees
  2. Mix ALL the ingredients into a large bowl and mix **reserving 1/2 cup of cheese & 1/4 c of salsa
  3. Transfer to an 8×8 greased baking dish…
  4. Top with extra salsa and cheese and in the oven it goes, uncovered
  5. Should be ready to eat in about 20 minutes, when cheese is melted and it is bubbly!

THANK YOU Wholesome Yum for your recipe!!! It was delicious and this fed 4 people


Let’s give your summer Corn a “lift” from the boring melted butter and use mayonnaise with Mexican seasonings, instead !!!! I had 5 ears but picked the 3 best and this is what I used for 3 ears

INGREDIENTS :

  • 3 ears of corn
  • 1/4 c of Avocado Oil ( or whatever oil you have on hand
  • 1/2 c mayonnaise (Hellmann’s or Best West NOT Miracle Whip!)
  • 1 TBS Chili Powder
  • 1 Jalapeño, seeded and minced ( If a Gringo, leave out)
  • 1/2 c  Cojeta cheese or Feta…no big difference, crumbled
  • I used seasoned Salt…just look at your spices and be adventurous!

DIRECTIONS: LIGHT THE Bar-B-Que


78B27C40-F3EE-42E1-B162-399C3480FED4Remove corn from husk and I picked the best 3 and made sure they were clean5AB7FA51-4F00-4B61-B6E4-7D71F5948EF4

Take oil and brush over each ear of corn

93645989-9132-42CC-A8D1-6D0BCD8258F8

Set in pan or directly on fire on high heat and roast turning frequently so it does not burn. About 15-20 minutes.

362C7D25-D4F7-44DD-997E-CFFEB2F2AF02

Mix together your ingredients into the mayonnaise

0658061E-8F9D-4004-9756-BFAE1805FA9F

Start getting excited !!!

535DE858-E7F4-440E-8309-8CBF8367B1AA

After Corn is grilled, lather them with the Mayonaise mix

8D54698B-EDAD-4D43-8F7F-DF4C1E8EFF32

Then top with the cheese, minced jalapeños and cilantro and enjoy each and EVERY morsel !!!!

Finger Licking, GOOD !!!


Since I have so much Cauliflower Rice on hand I was looking for recipes…and low and behold a frind comes by and brings me 2 mango’s!! Why?? I haven’t a clue. So I found this easy recipe at tastefulventure and had everything g on hand, so I made it !! It was quite good !! The sweetness of the mangos and then the squeeze of a full lime, for the dressing !! And it is sooo easy…well except for cutting the mango !! That is  for in itself!

INGREDIENTS

  • 1 head of cauliflower chopped and put in food processor to rice consistency and THEN PUT IN MICROWAVE for about 4 mins and stir, and put in fridge to cool.
  • 4-5 green onions chopped on an angle to look pretty
  • a bunch of cilantro chopped (about 1/2 c or more depending on how much you like cilantro !!
  • 1 TBS minced garlic
  • kosher salt to taste..don’t be shy
  • 1 large lime, juiced..(that means, squeezed)
  • 1can Block beans drained & rinsed
  • 1/4 c of red, OR orange OR whatever color pepper you have…I even used jalapeño…( or mix, it’s up to you !!)
  • 1 mango peeled, cored and chopped !! And that, my friends requires that maybe you should google how to do it because it is a slippery son of a gun !!
  • 12 grape tomatoes cut in half.

DIRECTIONS

EA5DFBC5-7C12-467F-9B3E-D5A4CCC98D70

Here is the Cauliflower cooked and cooled. I then added the green onions and the cilantro and jalapeño and stirred it up.

FDEAD285-9DDC-449A-AD64-7E13FD400FEF

I then took the mangos, beans, orange peppers& tomatoes and arranged the ever so pretty so you would get the idea!!

2C661658-6D36-41ED-A4B9-26871AA70926

Then I added the garlic and squeezed the lime all over it, added salt and stirred !! And this is how it ended up. Now mind you, this is half the recipe, seeing that it was only me, eating it!

I hope you enjoy it..!!

  • 01B5ED84-DDFF-4B46-ACF7-7C99C51AA98B
    9A4A35EB-C2A2-4D90-BF61-818A1CF36482ACA37BD8-2303-4CFF-A31F-BFBF5BAE5DB8F03EAF2C-7445-456E-81E5-14097353F9028EDC5CA6-B259-481D-90B4-CDAED511EE68181B0C67-299A-4AF2-8291-A495B8F06CED

DIRECTIONS:

  • 1 head of Cauliflower with all green parts removed, the cut into pieces
  • use food processor and pulse until small “rice like” pieces
  • then cook what you want and either freeze in individual sandwich bags or store in fridge . In fridge it will last about a week.

One head yeilded me 4 cups!! I LOVE rice but on Paleo, I substitute this and it is so dang good !!!!

INGREDIENTS:

  • 2-3 medium tomatillos
  • 1 jalapeño
  • 1 small onion, peeled and quartered
  • 2 large avocados
  • 1 lime, juiced
  • handful of chopped cilantro
  • salt to taste

The recipe is right here from Closet Cooking (one of my most FAVORITE cooking sites)!!!


EAF3B5DB-EBAA-4EAC-A163-0C2638A8A783

Your ingredients to cook on the grill. Take off the wrapping from the tomatillo, and peel onion.

180C84CE-179A-431E-BFC5-794BF0FD4548

Cooked and ready to go in to the food processor…

5BEEFAEF-AFC5-401B-A144-FF4AE18B3E04

Grill on a medium to high heat…but don’t leave unattended 

7068A549-4F10-4076-AEDB-CF062340B977

Peel the skin off the jalapeño, and chop the onion and tomatillo

5001107A-BCF1-475E-8ABD-1FF816BAC46C

Everything cut and ready to whirl

559CCECF-E37A-46DD-AFD8-DF3E470F1EA7

Add seasoning and cilantro and pulse it..

8018687F-6F61-47DD-84CF-7B3D63DD1B23

Now add some Mexican Cream

26244251-3CBF-4C0D-94D1-D65939381C87

Like so

F4E76CBA-55B1-4A24-A464-CF57A9626CAC

VOILA


INGREDIENTS:

  • 16oz pkg of fresh strawberries cut into small pieces
  • 1 lg Avocado cut into small pieces
  • 1 jalapeño seeded and minced
  • 1/2 red onion, finely diced
  • 1 lime, juice and the zest
  • Handful of chopped cilantro
  • Salt & Pepper

DIRECTIONS:

  1. go gather EVERYTHING and chop, mince and measure!!
  2. Take the jalapeño, red onion and lime with zest, put all into a bowl and mix…then put aside for a few minutes
  3. Now add the rest of the ingredients into the bowl, and mix “gently”…you do NO want to make the avocado mushy !!
  4. put it in the fridge to chill thentke out and serve with Taco,s, on top of chicken, or fish, or pork or as a Salsa with chips.  The possibilities are endless!!! ENJOY and thank you Elaine for Eating for the inspiration!! 

INSTANT POT POTATO CORN CHOWDER

So hearty, cozy and creamy – perfect for those cold nights! And it’s made right in your pressure cooker so effortlessly! It’s comfort food at it’s easiest!

INGREDIENTS:

  • 4 slices bacon, diced
  • 3 cloves garlic, minced
  • 1 onion, diced
  • 4 red potatoes, chopped
  • 1 (16-ounce) package frozen corn kernels
  • 4 cups vegetable stock
  • 1 teaspoon dried thyme
  • Pinch of cayenne pepper
  • Kosher salt and freshly ground black pepper, to taste
  • 3/4 cup heavy cream
  • 3 tablespoons all-purpose flour
  • 2 tablespoons chopped fresh chives

DIRECTIONS:

  1. Set Instant Pot® to the high saute setting. Add bacon and cook until brown and crispy, about 6-8 minutes. Transfer to a paper towel-lined plate.
  2. Add garlic and onion. Cook, stirring frequently, until onions have become translucent, about 2-3 minutes.
  3. Stir in bacon, potatoes, corn, vegetable stock, thyme and cayenne pepper; season with salt and pepper, to taste.
  4. Select manual setting; adjust pressure to high, and set time for 10 minutes. When finished cooking, quick-release pressure according to manufacturer’s directions.
  5. In a small bowl, whisk together heavy cream and flour; set aside.
  6. Select high sauté setting. Bring to a boil; stir in heavy cream mixture and cook, stirring frequently, until slightly thickened, about 4-5 minutes. If the mixture is too thick, add more vegetable stock as needed until desired consistency is reached.
  7. Serve immediately, garnished with chives, if desired.


8C67063E-9E51-476D-90D5-E753CFDFA871
4 in 1 instant pot
6E0F5586-78B5-443F-A5D5-EBCCCCE5CA1F

Cooked bacon

D0807CF4-60A3-41CF-AC5A-022580FDFABC

then saute onions & garlic (saute setting)

6D001467-F15D-4786-87F7-6186D9510D02

then add the rest of ingredients & use pressure cooker setting for 10 minutes

0377C575-AEAE-4AFE-BDD7-C64050605865

add cream & flour that was mixed together then add to pot for thickness

53AB6B83-6F3A-475A-B2EA-05EAE19E0C79

The Final Result! YUMMM

Recipe from Damn Delicious!!


With the price of Bacon going up and up, and the amount that I seem to consume, it only seemed natural that I would try and make my own Bacon…but, how do it, I didn’t have a clue! And now, thanks to the internet, I researched, watched You Tubes and put my big girl panties on…and took the challenge!!

This process is so darn easy…it’s the PATIENCE of waiting for it to “cure”, that is the difficult part!! So, here we go! And, BTW, I made a Maple Flavored Bacon

INGREDIENTS: (this is for a 3 lb slab of uncured Pork Belly)

  • 3 lb uncured Pork Belly
  • 5 TBS Kosher Salt
  • 5 TBS cracked pepper
  • 3 TBS Dark Brown Sugar
  • 1/2 c Maple Syrup (not necessary if you don’t want Maple flavored)
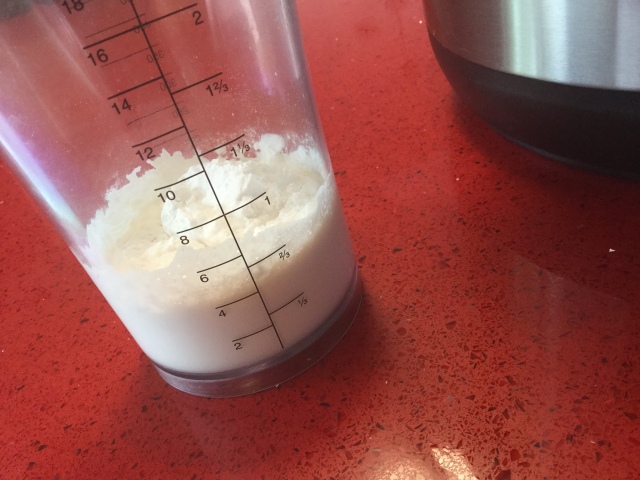
  • 3/4c Distilled water…don’t ask me why but that’s what the recipe called for!
  • 1/2 tsp Morton Quick Salt (this is the “curing salt” and available in grocery stores where the Pink Prague #1 is so hard to find unless you go on line)

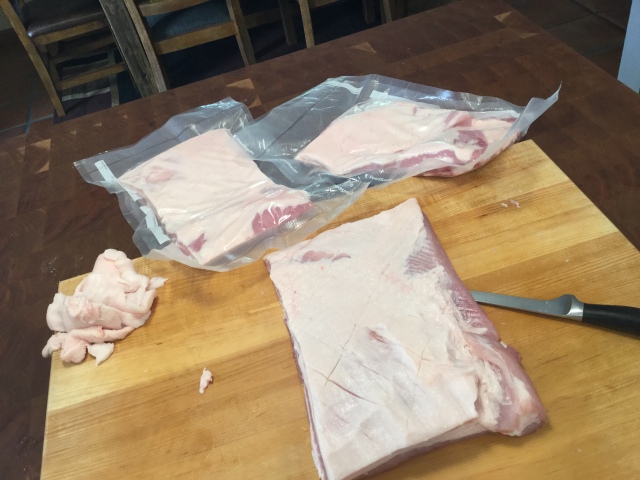
First thing you need to do is buy some boneless pork belly! I went to Costco and picked this 9.84 pound slab at $3.69 a pound and came home and cut it into thirds.  The magic number of 3lbs/slab seemed to be what most recipes called for…so that’s what i did!

IMG_3216Next you “score” the fatty part and I vacu-sealed the other 2 and put them in the freezer.

IMG_4360

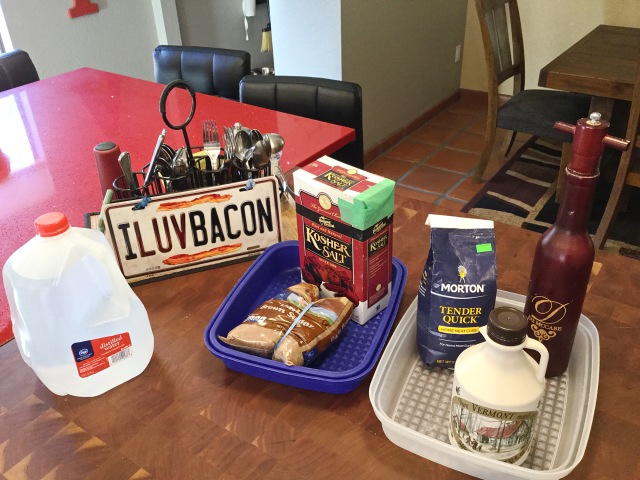
Then gather your ingredients:

Kosher salt, Brown sugar, Distilled Water, Pepper, Morton Tender Quick (the curing salt), and Maple Syrup

IMG_4403

Mix it all together, then pour on the slab, cover it in a container like this or a gallon zip lock bag, and put it in your fridge for the next 9 days…turning it over every morning!!

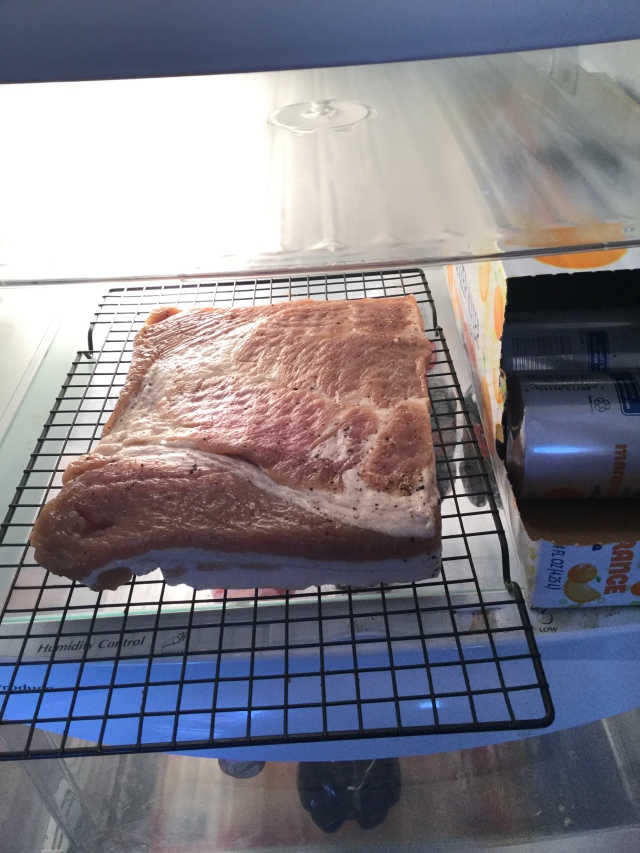
When you have “patiently” waited the 9 days, take the slab of pork belly out of the curing fluids and wash gently, taking off any excess remnants of the curing process, dry with a paper towel then put on a wire rack or a plate and leave UNCOVERED, in the fridge for 24 hours…(yup, more dang waiting…this is when I had to triple my ADD medications!!)

IMG_4381

And NOW, DAY 10…FINALLY, it is time to smoke this baby!! I used a Traeger Smoker (thanks to my neighbor) and set the temp to “smoke…stuck a thermometer into it and ONCE AGAIN, “patiently” waited for it to register at 150 degrees, internally, but I must admit, it was not that bad to wait because the aroma “tantalized” every golfer that tee’d up their ball (I live on a tee box)…and it took about 2 hours!

At long last, I removed the long adorned “Smoked Gift from the Pork Gods” and brought it to my kitchen where, freaking ONCE AGAIN (lord Jesus, Mary & Joseph), I had to put it in the fridge to harden it so that cutting it would be easier!!!

fullsizeoutput_4af9

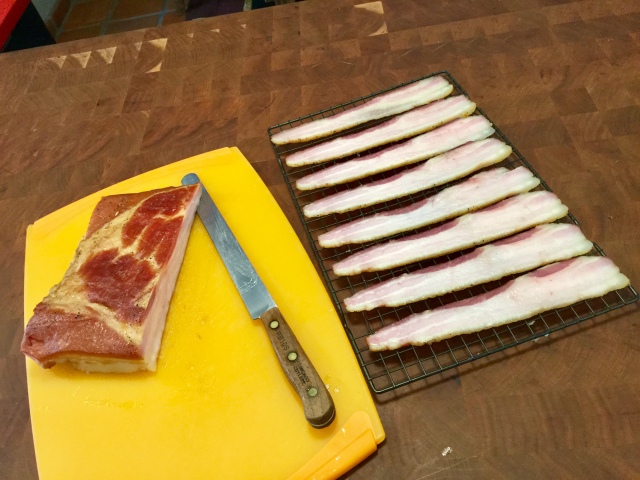
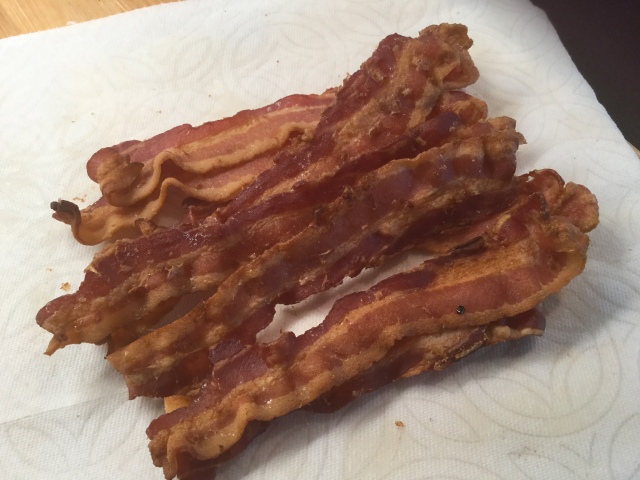
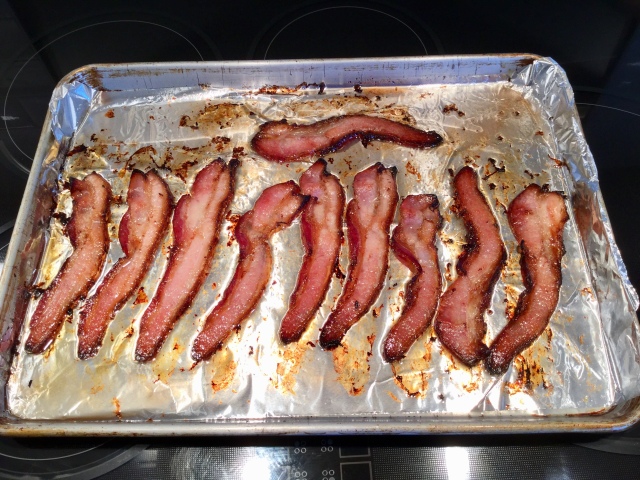
I sliced the Bacon and then put it on a large 1″ cookie sheet, lined with aluminum foil into a COLD oven…then set the temp at 400 degrees and in a matter of minutes (about 10-15 to be exact) I took it out and no, it was NOT crispy NOR should it be, but some little burnt areas around the edges…

fullsizeoutput_4b00

And proceeded to make the MOST delicious BLT Sandwich on lightly toasted white bread, lettuce and tomatoes….and remember those golfers??? well they came back and wanted their very own BLT sandwiches!! So, that 3 lb slab was gone in a nano-second and the two in the freezer…they are defrosting as we speak!!  SOOOOO worth the “waiting”!!
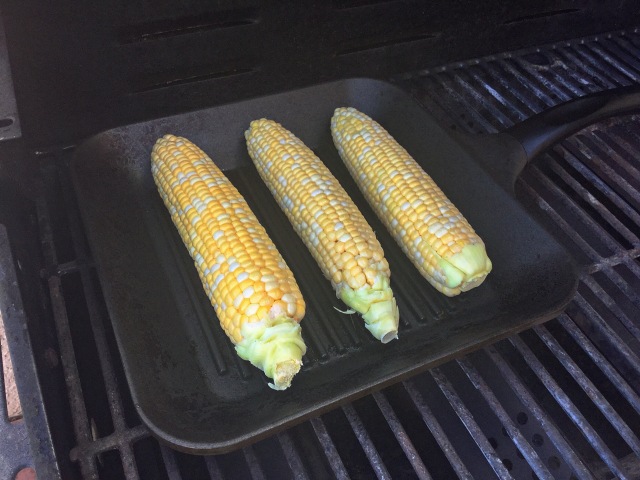


This will be the easiest recipe I have ever posted!! Just TWO ingredients!! Yes, you read that right..TWO!! Nestles Toll House Cookie tub and either 1 lb of bacon that YOU cook, or 2 c of Kirkland Bacon Crumbles from Costco…for me, I mixed BOTH!!

DIRECTIONS:

  1. Preheat Oven to 350 degrees
  2. cook Bacon until nice and crispy, for me that is 20-24 mins (and I ALWAYS START WITH A COOL OVEN)
  3. Drain bacon and then chop finely OR use your bacon crumbles…your choice.
  4. Put in little bowl and take a TBL of cookie dough and “roll” it in the bacon and then put on cookie sheet. Fill the sheet and put in oven for 12-15 mins depending on how you like your cookies! I like mine “crispy”!!
  5. Take out and cool and then VOILA…

Could this be any easier?? No measuring, no fuss, and little mess!!  It may sound like a weird combination, but it IS DEEDEEDEELICIOUS!!!! You have to try it!!!

Posole is like a marriage of chili & gumbo...and the longer you let it sit, the better it tastes!

Posole is like a marriage of chili & gumbo…and the longer you let it sit, the better it tastes!

INGREDIENTS:

  • 2 lbs of pork or chicken (I used left over pork tenderloin) but pork shoulder or pork roast is less expensive and more favorable
  • 2- 10 oz cans diced tomatoes with green chilies (Rotel is what I used)
  • 2- 28 oz cans of white or yellow hominy, drained and separated in half
  • 2 -14.5 oz cans of chicken broth
  • 2- 10 oz cans of red enchilada sauce
  • 1 TBS vegetable oil
  • 1 cup onion, chopped (1 medium onion is about a cup)
  • 2 TBS minced garlic (from the jar is the easiest)
  • 1 TBS Chili powder
  • 1-2 tsp Ancho Chili Powder (gives it a smokey taste)
  • 1-2 TBS ground cumin ( I like more)
  • 1/2 tsp salt
  • 1/4 tsp ground pepper
  • 1 C fresh cilantro leaves, chopped…(or more if you LOVE cilantro)
  • lots of sliced lime wedges ( 1 lime cut into 8ths)

DIRECTIONS: GO GATHER ALL YOUR INGREDIENTS, open cans, cut up, measure etc. then start!!

  1. Take whatever pork you have chosen, trim the fat and cut into 1/2 inch cubes. Brown in oil over medium heat then remove from heat and put aside in a bowl
  2. Add some oil to pan and now saute onions until tender…about 3-4 mins
  3. Now put meat, onions and garlic into stew pot (I used my slow cooker) and add the tomatoes, the 2 cans of enchilada sauce, all the seasonings and 1 1/2 cans of chicken broth and 1/2 (or 1 can of the hominy, saving the other can that was drained…or eyeball it!)
  4. Now put slow cooker on for 2 hours and let the smell permeate throughout your house…or, you can put it in a stew pot and bring it to a boil, then reduce the heat and simmer for 30 mins until the meat is tender.  Just depends in what kind of rush you are in!!!
  5. Take the other can of hominy (that was drained) and add it to a food processor and blend it till it is pureed.  Add the other 1/2 c of chicken broth at the same time. This pureed hominy thickens the stew.
  6. If you are using the slow cooker, take the lid off and after an hour, add the pureed AND the whole hominy to your pot and let cook for the last hour.
  7. Finally, when it is ready, take out and serve into bowls…add as much cilantro that you would like, some cheese if you so desire, and then squeeze the lime on top and PHEW…it is worth the work!

Thank you starman5 for the inspiration on making this.  What a hit and a new FAVORITE!!!